Photographic Techniques |
Taking photographs of small, active wild creatures can appear to be quite challenging. Butterflies and dragonflies can be very active insects and often don't keep still long enough for the photographer to compose and take the shot. Birds are always wary of potential predators, so getting close enough to them to take photos without carrying huge lenses around can be difficult. However, by paying attention to the following points, successful shots can be taken. Know your subjectIt is vital that you spend time learning about the species you want to photograph. If it's an insect, when is it on the wing? What plant(s) do the adult and larvae feed on? What habitat can you find it in? How does it behave?Know your equipmentFor insects, a lens which makes small things appear larger (a macro lens) is desireable. For birds, the requirement is quite different: a telephoto lens is needed to take photographs at long range. Whatever equipment you have, you must be totally comfortable using it.Practise makes perfectThere is an old saying: Proper Preparation Prevents Poor Performance. So practise with your equipment as much as you can. You'll discard a lot of shots, but with digital cameras these don't cost money. Your aim should be to take photographs which require little or no manipulation on the computer.Learn and use fieldcraftFieldcraft is the art of getting into a position to photograph wild creatures without scaring them. Butterflies are less active at the beginning and end of the day, or if it's cloudy. They are likely to be easier to approach under these conditions. Birds, on the other hand, are always wary, and unless you have access to a hide you have to be patient to get your shot. Generally it is better to let the subject approach you, rather than the other way round.The Exposure TriangleThe exposure triangle is a common way of associating the three variables that determine the exposure of a photograph: aperture, shutter speed, and ISO. One must balance all three of these to achieve the desired result, as an adjustment of one requires adjustment of at least one of the others.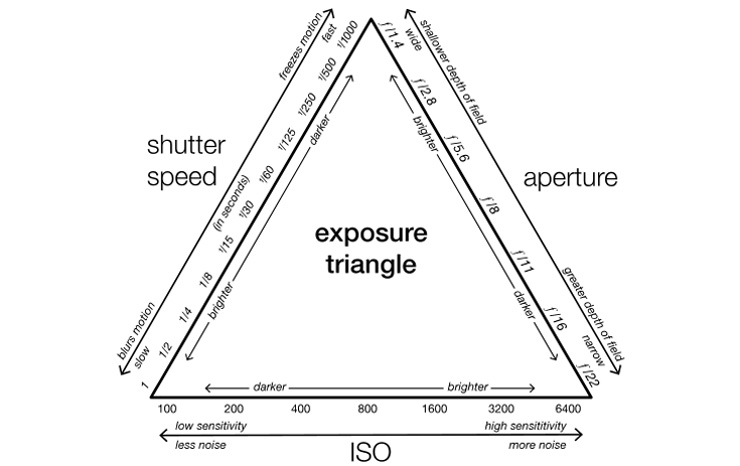 (image © WClarke) Side 1: ApertureAperture is a measure of how much light the lens allows in. A wider aperture (lower f-number) means more light will be let in by the lens, simply because the opening is larger. A narrower aperture (higher f-number) allows less light to reach the sensor. Depth of field is a by-product of aperture. Narrower apertures give a greater depth of field, allowing more of an image to be in focus. Wider apertures create a narrow depth of field, which can help isolate a subject. The aperture can always be modified by using additional lighting, but the resulting images may not look natural.Side 2: Shutter SpeedShutter speed is a measure of how long the shutter remains open, and thus how long the sensor is exposed to light. Faster shutter speeds give the sensor less time to collect light, resulting in a lower exposure. Slower shutter speeds allow more time for the sensor to collect light and result in a higher exposure. If the shutter speed is too low to hand-hold the camera, use additional support. If you put the camera on a tripod, you freeze the motion of the camera (a cable or remote release will freeze motion of the camera shutter as well). This means that you can use a slower shutter speed, which allows the aperture to be stopped down, thus increasing the depth of field. But tripods are cumbersome to carry about, and they inevitably require setting up before the shot can be taken, so it becomes difficult to take advantage of targets of opportunity. A monopod can be an acceptable compromise.Side 3: ISOIncreasing the ISO essentially allows you to work with less light (by effectively increasing the sensitivity of the sensor). As always, though, there’s a tradeoff: increasing the ISO results in increased noise and less detail. Noise is the result of random fluctuations in an electrical signal. At lower ISOs, the magnitude of the image signal is large relative to the noise (signal to noise ratio), meaning the noise generally remains unobtrusive. When working at higher ISOs, the image signal is generally close in magnitude to that of the noise, resulting in noise entering the image. So, why ever use a high ISO? Often, when working in low light conditions, you will find yourself at a point where you are using the widest possible aperture and the slowest shutter speed you can. At this point, your only choice is to increase the ISO. The lens cannot physically open any wider, and sacrificing sharpness for a slower shutter speed is rarely advisable.Camera ModesAperture PriorityIn this mode, you set the required aperture and ISO, and the camera works out the shutter speed to give the correct exposure. The problem with it is that the calculated shutter speed may be too slow, meaning the image will not be sharp.Shutter PriorityIn this mode, you set the required shutter speed and ISO, and the camera works out the aperture to give the correct exposure. The problem with it is that the calculated aperture may be too tight (or too wide), thus causing the depth of field to be too large (or too small).Manual + Auto ISOIn this mode, you set the desired shutter speed and aperture manually, and the camera works out the ISO to give the correct exposure. This is a better solution than Aperture priority, as there isn't a need to change the ISO manually to control the shutter speed. Changing the shutter speed or aperture can be done with the dials, meaning there is no need to look away from the viewfinder. Exposure compensation can be used to prevent under- or over-exposure. Reprogramming the Set button to do this means that again there is no need to look away from the viewfinder. NB: this mode isn't available on all cameras.Back button focussingBy default, pressing the shutter release button halfway on a Canon focusses the image, and pressing it fully releases the shutter. By changing which functions are mapped to particular buttons, you can make the shutter release button perform just that function, while metering and auto-focus is done by the Star button on the back of the camera.Image stabilisationA number of manufacturers now make image-stabilised lenses or camera bodies. In the Canon implementation, IS works by using a floating lens element that is moved orthogonally to the optical axis of the lens using electromagnets. Vibration is detected using two gyroscopic sensors, one to detect horizontal movement and the other to detect vertical movement. As a result, this kind of image stabilizer only corrects for pitch and yaw axis rotations, and cannot correct for rotation around the optical axis.The practical effect of an IS-equipped lens is to permit the use of shutter speeds 2–4 stops slower (exposures 4–16 times longer) than would be possible with a non-IS lens. This naturally increases the depth of field. The down side is that IS lenses are expensive and relatively heavy. They also can't do anything about motion of the subject or extreme movement of the camera. The Canon EOS R5 and R6 mirrorless bodies are the first Canon cameras with 5-axis In-Body Image Stabilization (IBIS), and can deliver 8 stops of IS when the cameras are paired with certain lenses. The lens and camera are in constant communication to determine the right amount of compensation to be applied to remove any shakes. The gyroscopes in the camera allow for roll to be countered, which lens IS can't do. Click here for more details. |